
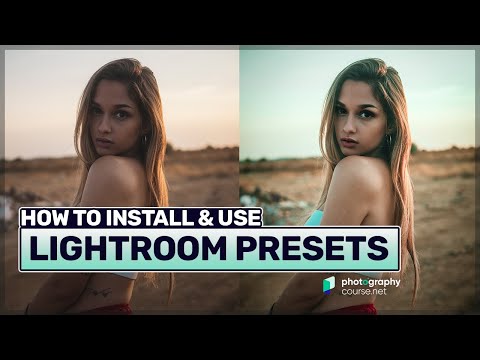
Adobe Lightroom is one of the best softwares for photo retouching, and using the Presets developed for Lightroom, photographers can save a lot of time.
We have put together a detailed step-by-step tutorial on how to install Lightroom Presets, for both desktop and mobile.
Tutorial for Installing Presets in Lightroom 8.1 and newer versions (including LR 9.1)
1. Launch the Lightroom Application and click on the Develop module.

2. Go to the Presets panel, and in the top right hand corner of the Presets panel, click on ‘+’ icon and then click Import Preset.

3. Locate the purchased presets collection folder and choose the zip file (you can also add XMP or Lrtemplate files if they’re already unzipped).

4. Once the import is complete, you should see imported presets in a new list of category titles in the Presets panel or in the User Presets category. You can easily rename the folder to something specific by right clicking on it.

5. Enjoy your new Presets!
Tutorial for Adding Presets in Lightroom 7.2 and older versions
1. Locate the downloaded preset pack on your computer.
2. Unzip / extract the downloaded .zip file. Open the extracted folder and check its contents:
- Presets folder (LRtemplate)
- Presets folder (XMP)
- Installation guide
- Before/After images
3. Copy the Presets folder (LRtemplate).
4. Launch Lightroom. On Windows, go to the top menu and then click Edit > Preferences. On Mac, click Lightroom > Preferences.

5. Go to the Presets tab and click on “Show Lightroom Presets Folder”.

6. Double click on “Lightroom” folder.
7. Double click on “Develop Presets” folder.
8. Paste the Presets folder (LRtemplate) into the Develop Presets folder.
9. Restart Lightroom application.

10. Enjoy your new Presets!
Tip: Stay organized by creating specifically-named folders for every presets collection pack that you may install.
How to Install, Use, and Sync Presets in Lightroom Mobile
Mobile presets in Lightroom are versatile and easy to use. They can make your photos look more cinematic, nostalgic, vibrant, etc. It’s completely up to you! This can help you develop your style and get comfortable with advanced editing tools.
Lightroom comes with its own original presets. These are basic edits that are meant to improve your editing workflow. Most photographers find that these presets are too limited. If you can relate to this, consider investing in premium presets or downloading free ones. All you need to know is how to install, use, and sync them.

How to Install Lightroom Presets in the Mobile App (Step by Step)
1. Download Your Presets

If you downloaded the new presets on your computer, add them to a file hosting service like Dropbox. This will make it easy for you to transfer all the files to your phone. Alternatively, you can transfer the files directly to your phone using a USB cable.
If you downloaded your new presets on your phone, you probably have to unzip the DNG files first. You can use apps like WinZip or iZip to do this. If you’re an Android user, you can unzip it without having a 3rd party application. Once the files are unzipped, go to the mobile app.
2. Import Presets Into the Mobile App

Open the Lightroom app and create a new album. This will keep all of your presets in one neat folder. Click on the gallery icon with the plus sign next to it. Select Files and click on all the presets you want to import. Your DNG files should appear within seconds.
a. If you have download the files through iZip, click on Files and then navigate to iZip files.
b. If you download/copy them directly to your phone, select Device/Camera Roll.
Now, select a preset that you’d like to start using.
How to Use the Presets
There are 2 methods to use the presets on mobile.
Method 1 – Copying and Pasting Settings
1. Copy the Preset Settings

Applying Lightroom mobile presets is a very easy process. Click on the three dots above or below your image. (They might be located on the left or right corner depending on your device.) Scroll down and click on Copy Settings. All of the chosen settings will automatically appear. Click on the checkmark to copy them.
If you want to avoid using a certain setting, you can click on one of the checkboxes to deselect it. For example, if you don’t want your photos to look grainy:
- Click on the arrow next to Effects
- Click on the checkbox next to Grain

2. Apply the Preset to Your Pictures

Go back to your folder and select an image you’d like to edit. Click on the three dots again. Scroll down and press Paste Settings. Your photo should immediately look different. That’s it!
You can apply the presets to multiple images at once. Go to your image folder and select a few photos. Then, click on the three dots and press Paste Settings. This feature isn’t free. However, it might be a worthy investment if you want to create a consistent look in your smartphone
3. If Something Doesn’t Look Right, Adjust Your Settings

Pre-made presets aren’t always perfect. If your photo looks too overexposed, saturated, or grainy, you can adjust your settings manually. You can think of presets as foundations for your work. They take care of the most important aspects of your image. You’re in control of the details.
Select any of the icons on the screen. The ones with the stars are premium tools, so you’ll need to pay for them. Fortunately, you can use most of the other adjustments for free.
There’s a lot you can do with basic adjustments. You can change the exposure, colour temperature, texture, and much more. If you have time to play around with these settings, do it! It’s a great way to familiarise yourself with various Lightroom tools.
Method 2 – Saving the Presets
This method will help you save your presets in one neat folder. Once you save a preset, you don’t need to copy/paste its settings again. You can save this method for presets that you want to use regularly.
1. Create a Preset

Open the DNG file and click on the three dots above or below your image. Select Create Preset.
2. Name the Preset

Give your preset a name. You can save it in a group. If you don’t create a group, the mobile app will automatically save it in User Presets.
You’ll notice a few checkboxes underneath the preset name. You can leave them as they are or adjust them as you wish.
3. Go to Your Image and Select the Preset Icon
Next, go back to your library and select the photo you’d like to edit. Select the preset icon, as pictured above. It looks like two small circles overlapping.
4. Find the group where the Preset is located

A new window will open. You’ll see all the standard preset groups (creative, black & white, etc.) Select the group you created or scroll down to User Presets.
Select the preset you created. This will automatically transform your photo. From now on, you can apply this preset to any image you like.
5. Make Adjustments if Necessary

If your photo looks too overexposed or underexposed, don’t worry. You can quickly make adjustments by selecting one of the editing tools in the app.
The free version of the mobile application will let you control your image’s exposure, contrast, highlights, whites, blacks, and much more.
How to Sync the Presets

If you use both desktop and mobile apps, you can sync your presets.
This is a time-effective way to sync all of your resources. However, it’s available for Lightroom Classic and Lightroom Creative Cloud users only. If you’re using an older version of Lightroom, you’ll have to install your presets manually.
1. Start in the Desktop App of Lightroom
Open the Lightroom CC desktop app and go to the Develop module. This is where your presets are located. Right-click the preset you want to sync. Click on Show In Finder. (The Windows alternative should look similar.)
Copy all the presets you want to sync. Paste them in a different folder. This will make it easier for you to locate them later on.
2. Import Your Files Into Lightroom CC Desktop App
Open Lightroom CC. Go to File > Import Profiles & Presets. Select your presets. They will automatically appear in Lightroom CC and the mobile application.
Once you learn how to install and use them, you’ll have helpful editing tools for life!


